Keeping your gas grill clean is very important. Check out this guide to learn how to clean a gas grill.
If you have been firing you your gas grill all summer, it probably can use a cleaning. Before you grill some steaks or fresh corn on the cob, make sure you give that grill a good cleaning. Keep reading to learn everything you ever wanted to know about how to clean a gas grill.
Table of Contents
Why You Should Clean Your Grill
You should know that you don’t need to scrub down your grill to shining perfection after every use. But, you’ll want to give it a nice deep cleaning every once in a while. Think of this cleaning as maintenance to make sure your grill will continue to run efficiently and safely.
You’ll want to bookmark this article so you can refer back to it throughout the year. A clean grill means your grill will function and perform well. You’ll want to follow your grill’s instructions and clean that baby annually or semi-annually, depending on how big of a grill master you are.
When you don’t regularly clean your grill, you risk accumulating an unsafe buildup of grease. When this happens, your gas has trouble easily flowing through the ports. This could lead to strange smells or even a scary flareup.
If you don’t have your grill’s cleaning instructions, don’t worry. Keep reading; we’ve got you covered.
When Should You Clean Your Gas Grill?
Again, how often you clean your grill will depend on how frequently you use it. Typically a once-a-month scrub down of the bars, grates, and grease management system will do the trick.
Or, if you see that your grill isn’t heating up as high as usual, or is struggling to reach over 500 degrees Fahrenheit, this could be a sign to clean your grill.
How To Clean A Gas Grill
Before you start to clean your grill, make sure you have the right tools handy. Here’s a step-by-step breakdown of how to clean your grill.
1. Get Your Supplies Ready
You will need soap and water, gloves, a bristle brush and/or a putty knife, cleaning rags and paper towels, and a grill brush or any coarse cleaning brush.
2. Turn Off Your Gas Supply
You’ll want to make sure that the gas to your grill is turned off. You also might be able to detach the gas tank from the grill, which works just as well.
3. Remove the Grill Grates
Next, you’ll want to take off your grill grates. Pull each grate out, so you can give each one a good thorough clean.
4. Clean the Grill Grates
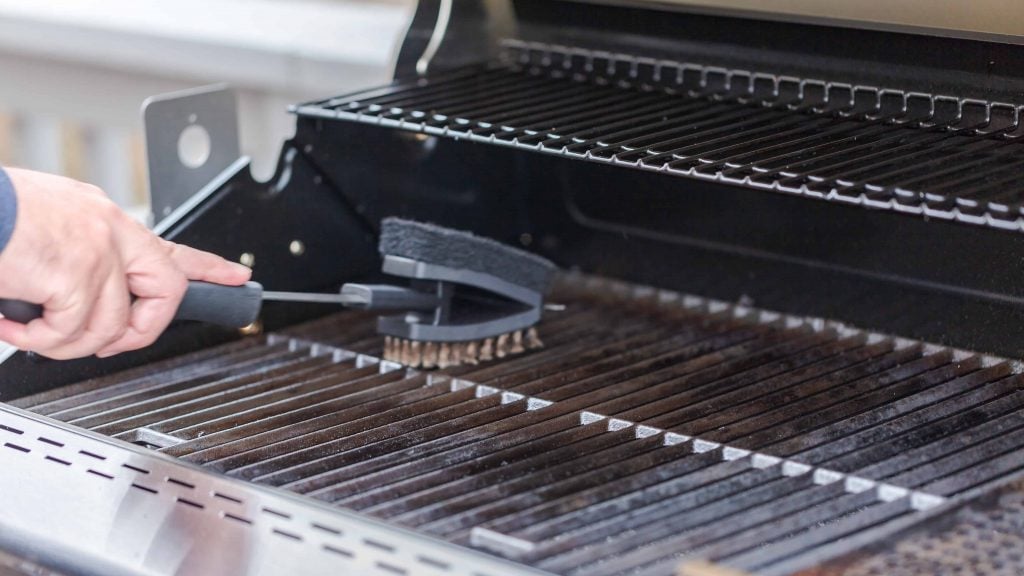
Scrub each grate thoroughly with a grill brush or other coarse cleaning brush. Make sure you really get in there, removing gunk and build-up.
You should always brush these grates before you grill. Do this after you preheat the grill by brushing the grate with a wadded piece of foil or grill brush since it’s easier to loosen these bits when the grates are hot. You’ll want to remove any burnt pieces of food from your last grill.
Also, when you’re cooking, you will want to oil your hot grates before you grill. This way, food won’t stick in the grates and you won’t have to worry about removing it later.
It’s also good to get into a habit of brushing your grates after grilling. If your grill has too much stuff trapped in it, this can hurt the effectiveness of your grill as well as the quality of the food that you are cooking.
At the same time, “too much” is the keyword here. You don’t want to completely clean your grill, because those bits and pieces can add flavor.
You want your grill cleaning to leave behind a light layer of barbecue drippings. It’s all about that balance, and not getting your grill to the point where there’s a heavy grease build-up, which can hurt the airflow of your grill.

5. Clean Anything that Covers the Burners
Next, you’ll want to remove the V-shaped metal heat tends on the grill. This includes any lava stones and or ceramic briquettes that cover the burners. Once removed, clean all those pieces with a brush.
6. Clean Burner Tubes
Now you’ll want to take your brush and lightly brush your burner tubes. You’ll want to make sure that all of your gas ports are open and clean.
It’s important to keep these tubes clean, as any buildup can make it hard for the gas to flow. This can prevent your burner from lighting properly or even at all.
You’ll want to make sure you clear out all of the grime by brushing the portholes with a stainless steel wire brush using an up and down motion.
You do not want to brush lengthwise across your ports, as this will just push your debris from one hole and into another.
7. Clean the Lid and Bottom of Grill
Next, take a wipe or brush and clean any debris out of the bottom of your grill and the lid. If you see any black stuff that is peeling, that is usually a sign of grease and carbon flakes. You will want to use a bristle brush or putty knife to remove those flakes.
Cleaning your grill’s cook box might look tricky, but it’s not that difficult to do. Keeping your cook box clean really affects how well your grill performs.
To do this, you’ll want to wait until your grill has completely cooled down. Then, after you removed your cooking grates, used a stainless steel brush to clean all the extra grease and debris in there.
Make sure you get inside the cook box to the bottom of the tray. Once you do this, you’ll want to discard all of the crust.
8. Clean the Grease Collection Tray
You’ll want to clean out your grease collection tray with some water and soap. If your grill has disposable pans, you will want to replace and or dispose of them if needed.
You should be checking these trays every time you grill. You never want them to be full, as that could lead to a dangerous grease fire.
You always want to make sure your collection tray or catch pan is clean and debris-free. This will not only prevent grease fires, but it also prevents unwanted critters from getting into your food.
Do this by removing the tray below your grill, and set it over a big trash can. Gently scrape the inside of your grill using a putty knife. You’ll want to push all the debris to the bottom.
To deep clean your tray, you’ll want to use soapy warm water and a fine steel wool pad. Also, check your catch pan monthly, and replace it when you need to.
9. Dispose of Grease
You need to make sure that you properly dispose of any grease. You cannot wash grease down the drain, as this will clog up your pipes and cost you a fortune in plumbing.
Instead, pour any grease into a non-recyclable bottle or can. Let that grease harden, and then you can throw the entire can or bottle out.
10. Clean the Outside of the Grill
Next, you’ll want the outside of your grill to look nice. To do this, wipe down the outside of your grill, along with any side tables, using water and soap.
Do the same with your side tables. If they are stainless steel, use a microfiber towel and stainless steel cleaner.
And one word of advice with the cleaner: Be patient. Let the solution sit for 5 to 10 minutes so scrubbing is easier.
11. Put Your Grill Back Together
Now you’ll need to put all the parts of your grill back together. Once your grill is assembled properly, you can fire that baby up again!
If Your Grill Has a Heat Distribution System
You should know that a lot of grills (especially those built by Weber) come with a heat distribution system, or flavorizer bars. These bars are meant to help prevent any flare-up.
Similar to the rest of your grill, these bars can easily get gunky the more you use your grill, which is why it’s a good idea to regularly brush them.
You can either use a grill brush or scape them with a putty knife. Then, you’ll want to wipe these bars off with some warm, soapy water using a rag.
If your grill has warming racks or grill baskets, you will also want to rinse those out from time to time. You can do this by using a fine steel wool pad and soap to remove any debris or smoke stains on these racks and basket. Just rub them down gently, and then rise them fully before putting them back into your grill.
Clean Your Grill Today
Now that you know how to clean a gas grill, clean your grill today. Remember, a clean grill keeps your barbecue running well, making you the ultimate grill master. For more BBQ tips, be sure to check out our blog!


